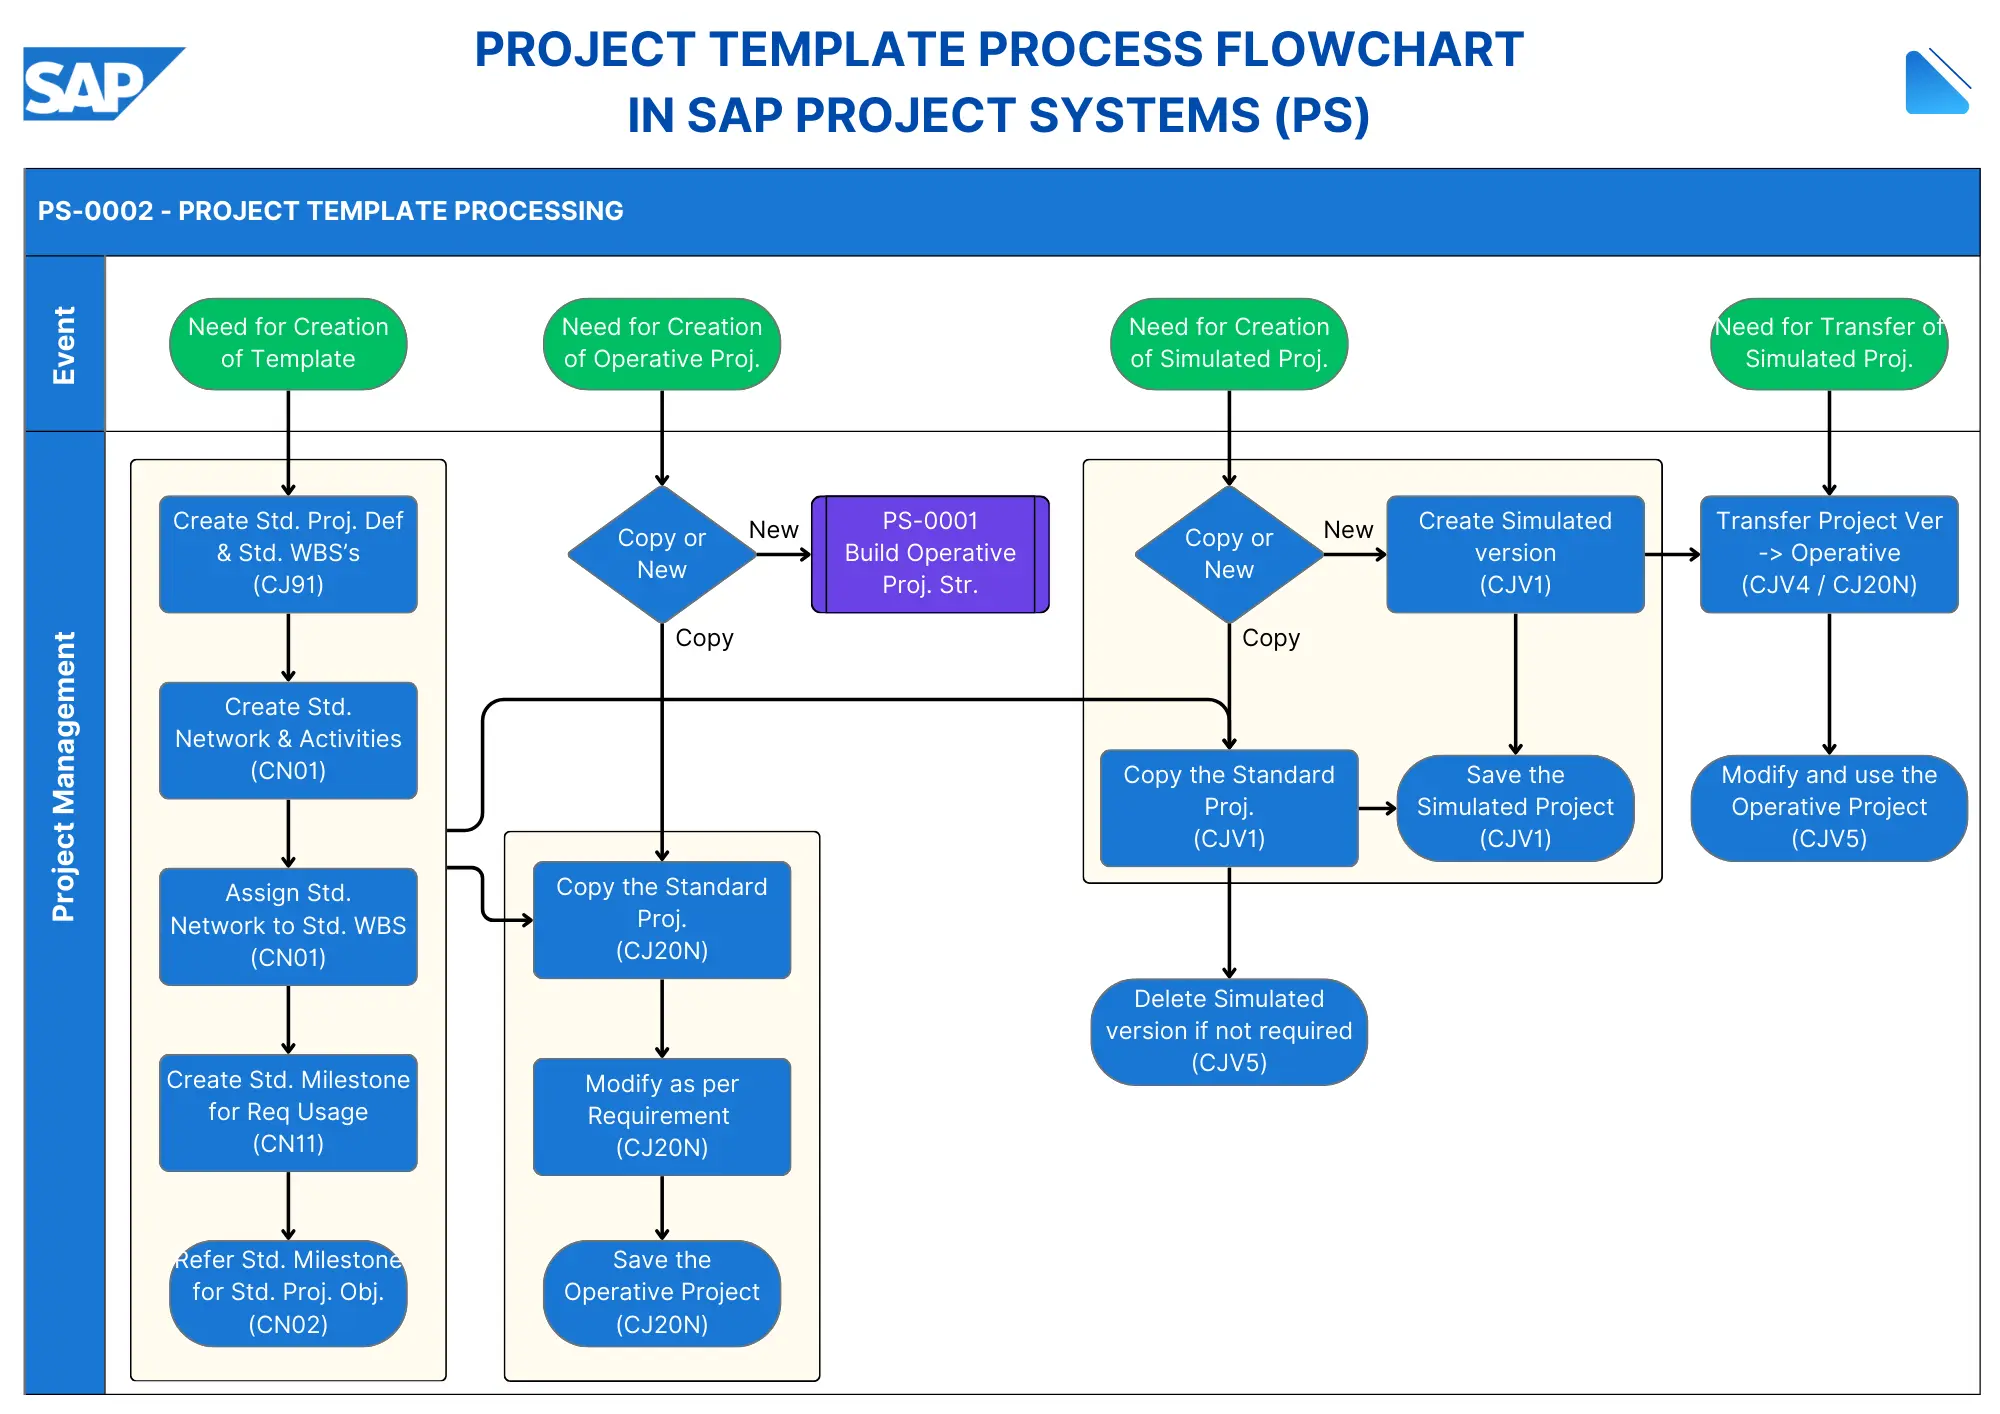
This flowchart illustrates the complete project template processing in SAP Project Systems (PS), showing how to create and manage standard project templates that can be used for operative and simulated projects.
Below is a breakdown of process steps for flowchart image:
Standard Project Definition & WBS Creation (CJ91): A Project Definition is the highest level of a project’s organizational structure that contains basic project data and parameters. The Work Breakdown Structure (WBS) represents the main structural element in SAP PS that allows hierarchical organization of the project, breaking it down into manageable components. Each WBS element is connected to lower levels, but they can be placed beside one another to form a matrix structure. Collectively, they are called ‘Operative Projects’. A WBS can be copied from what is termed a ‘Template’ or ‘Standard Project’, or from another Operative Project. The whole structure is ‘owned’ by the Project Definition.
The first step is to create a Standard Project Definition using transaction code CJ91. This allows you to define the overall structure of the project, including its objectives, scope, and key stakeholders. During this step, you will also create a Work Breakdown Structure (WBS), which breaks down the project into manageable sections or tasks. Each WBS element can have its own budget and timeline.
Create Standard Network & Activities (CN01): Networks are collections of activities that represent the operational execution level of the project. They are connected to WBS elements and can be split into two main components: labor and materials. Networks contain detailed activities with durations and dependencies that form the basis for project scheduling. The activities linked to the lowest level WBS elements typically include design, labor construction, material construction etc.
After establishing the WBS, you will create a Standard Network and its associated activities using transaction CN01. This network serves as a framework for scheduling and resource allocation.
Assign Standard Network to Standard WBS (CN01): In this step, you will assign the newly created standard network to the corresponding standard WBS elements also through transaction CN01. This integration ensures that all activities are linked to their respective project components.
Create Standard Milestone for Req Usage (CN11): Milestones are key checkpoints or events attached to both WBS elements and activities that represent significant project achievements. They can be simple date markers or have special intelligence built in. A critical use is for ‘Milestone Billing’ where payment terms are linked to milestone completion. When a milestone is given an actual completion date, it can trigger billing document creation through integration with Sales & Distribution (SD).
Transaction code CN11 is used to create Milestones and attach to WBSs or Networks.
Refer Standard Milestone for Standard Project Object (CN02): Using transaction CN02, you will refer to the standard milestone created earlier in the standard project object. This establishes a clear connection between milestones and project deliverables, facilitating better tracking.
Copy or Create New Operative Project (CJ20N): Once your standard project template is set up, you can either copy it or create a new operative project using transaction code CJ20N. This allows teams to initiate projects based on predefined structures without starting from scratch.
Create/Copy Simulated Project Version (CJV1): If you need to run simulations before actual implementation, you can create or copy a simulated project version using transaction CJV1. This helps in testing different scenarios and assessing potential impacts without affecting real projects.
Transfer Project Version to Operative (CJV4/CJ20N) Finally, once the simulation is complete and adjustments are made, you can transfer the simulated project version to an operative status using either transaction CJV4 or returning to CJ20N. This step finalizes the project setup, allowing it to move into execution.
The process ensures proper project template management and provides flexibility in creating both operative and simulated projects while maintaining standardization across the organization.
